Showing posts with label #onemotherkitchen. Show all posts

Monday, December 10, 2018

Broad bean burgers


Broad bean burger with ricotta cheese, avocado, spring onion and parsley. 


I love growing my own veggies. The best part is picking them to use in my kitchen. You would not believe how much better they taste and how better the texture is if you grow them yourself.

Just imagine harvesting a cucumber for example, and two minutes later serving it in a salad. Crunch, flavour and freshness, like you've never experienced before! Shits all over the plastic covered ones from the supermarket.

I recently harvested all of my broad beans. I have five freezer bags full in the freezer. I podded them all and then froze the individual beans. They defrost fine and is a great way to save them for use way after they have finished growing in the garden.

I made these delicious burgers, which I created and ate in several different ways, by changing the ingredients I used with the broad beans.

My hinting of a new food processor for Christmas has hopefully paid off, because I only had my mini processor to make these, which required me to pulse the broad beans in a few batches. There's a largish wrapped box under the tree, fingers crossed it's a new one.


I have taken to buying fresh beetroot and grating it into salads instead of buying it canned. It is lovely roasted too.


My favourite, poached eggs. A Broad bean burger instead of bread. Served up with avocado, spiralised zucchini and grated beetroot. I briefly blanched the zucchini swirls in the poaching water, removing before I cooked the eggs.

This is a basic recipe. I made it using a can of lentils the first time, and used a can of peas and corn the second. Both were good. Drain the canned veg well. With the lentils I used a handful of fresh chopped up coriander instead of ground. Use whatever you have in the pantry. If you don't have pepitas use sunflower seeds, sesame seeds or pine nuts etc. Experiment!


350 grams broad beans
1 can lentils, drained well
1/2 teaspoon ground cumin
1/2 teaspoon ground coriander
1/4 teaspoon paprika
1/2 teaspoon salt
1 heaped tablespoon pepitas
80 grams plain flour
1 tablespoon olive oil

In a food processor, pulse broad beans until coarsely ground. Add lentils, spices, salt and pepitas and mix until combined. Stir through flour.

Shape into five patties, about 1cm thick. Place on a plate lined with greaseproof paper and refrigerate for 30 minutes.

Heat oil in a large pan on medium heat. Add patties and fry about 7 minutes each side, until golden brown and cooked through. Serve in burgers or how ever you like. 

They are quite delicious.

Fair enough I could only fit four in my pan. I froze the uncooked patty wrapped in greaseproof paper, in a freezer bag and used it another time. 

I kept leftover cooked patties in fridge and reheated in the toaster in the morning for poached eggs. Worked a treat, a broad bean burger pop tart! As I am desperately trying to cut down on bread, particularly my beloved slices of sourdough bread at breakfast with eggs, these were awesome as a replacement.


Monday, June 18, 2018

Red lentil and caramelised onion soup


I should have mentioned in the title that this soup also has a winter favourite, pumpkin.

I made this last week and ate it for three days! It perfectly matched the chilly weather we've been having. I swear this past weekend I achieved nothing except for the usual mundane house jobs. I am not sure if it actually stopped raining on Saturday. Perfect for lazing, with or without pyjamas all day, with the heating on to keep from freezing our tits off! 

We've just bought a Nintendo Switch gaming system for the kids of course, but I did waste a few hours playing Super Mario Odyssey. I am well and truly sucked in, and cannot wait to get my hands on Donkey Kong Country.

When Jake was a boy, he'd go off to school and I would sit and play with his Nintendo gameboy. Pokemon was my game of choice. I loved it.

Then when he was a little older, I would sit in his bedroom and play Doom on playstation when he was at school! 

Here I was thinking my gaming days were over!

Back to the soup...It's nice and thick so will stick to your ribs and keep you satisfied. I reserved some of the caramelised onions and used them for garnish, with toasted pumpkin seeds and feta cheese for some more flavour. 

I must say I forgot about the pumpkin seeds when they were toasting in the oven, as you do. I saved them just in the nick of time, they were crunchy and nutty, without having that obvious burnt taste. Don't forget to check your pumpkin seeds!


 Ingredients:

2 Tablespoons olive oil
2 large onions, sliced
2 teaspoons ground cumin
2 teaspoons ground coriander
2 garlic cloves, chopped
2 cups cubed pumpkin
5 cups water or veggie stock
375 gr bag of red lentils(McKenzies)
feta cheese, for garnish
toasted pumpkin seeds, for garnish(about a tablespoon per bowl)

How to cook your soup:

Heat the olive oil in a large saucepan over medium heat. Add the onion and cook for about 10-15 minutes until soft and a light golden brown. Remove just under half of the onions into a bowl and set aside for the final garnish. 

Add the cumin, coriander and garlic to the saucepan with remaining onions and stir for 1 minute. Add the pumpkin, water and lentils. Bring to a simmer and cook covered for about 20 minutes, until the lentil are soft.

Use a stick blender to blend the soup.

When serving garnish with toasted pumpkin seeds, caramelised onion and broken up feta cheese.

If it wasn't so cold outside, I probably would have gone outside to get some fresh herbs to sprinkle on top, parsley, mint or coriander would be nice.

If you like a bit of heat, some chilli oil drizzled on top too.


Monday, November 27, 2017

Rosewater, cardamom and pistachio slice

During the month of November, SBS Food was asking for food lovers(that would be me), to get creative in the kitchen by putting a multicultural spin on Australian favourites. I am always up for a challenge in the kitchen and this slice was the result for the #BringBacktheClassics campaign. 

This is basically a differently flavoured version of vanilla slice. 

Vanilla Slice is my hubbys most favourite slice in the universe. I was a little worried he wouldn't like this new take on it, but he loved it and ate most of it! Good thing that, because my belly doesn't need any extra jelly. Don't get me wrong, I ate my fair share. It was delicious!


Slice ingredients
2 sheets frozen puff pastry, thawed
1/2 cup sugar
1/2 cup custard powder
1 1/2 cups cream
2 cups milk
1/4 heaped teaspoon ground cardamom
1 tablespoon rosewater essence

Icing
2 cups icing sugar
1 tsp butter/margarine
1/4 teaspoon honey
1/4 cup crushed pistachio nuts


Here's how...

Preheat oven to 220 degrees.
Place puff pastry on lined oven trays. Prick with a fork all over and bake for 10-15 minutes.

In a saucepan, put sugar, custard powder and cream. Stir over medium heat until it starts to thicken.
Add cardamom, rosewater, then add the milk 1 cup at a time. Whisk until the the custard is thick.
Let everything cool a little.

Using a 22cm square tin, place one pastry sheet on the bottom. Depending on what shape tin you are using, you may have to cut the pastry to fit.
Add the custard and then the other sheet of pastry on top.

Refrigerate while you make the icing. Mix all icing ingredients together and spread evenly over the top of the slice. Sprinkle the crushed pistachios over the icing, and you are done!

Refrigerate the slice for at least three hours before you dig in. It is best left for 12 hours though if you can wait that long.


Monday, June 19, 2017

My tips for making Sushi rolls


Sushi rolls are one of those recipes I make every now and again. I seem to get a craving for that seaweed flavour with the mayo and fillings.

My son LOVES sushi, and when I deliver it to his house, he delves straight in. It's one of those Mums' cooking things, and I hope it's one of the recipes he remembers me for. I am totes hoping that when he buys it somewhere else he thinks, it's not the same as Mums. In a good way. I would have never thought when he was a little boy, that one day, my favourite thing to drop off at his house food wise, would be sushi rolls! I even take a little tub of soy sauce, along with a lot of love.

I've been making sushi rolls for what seems like forever, but I think it's been about six or seven years. Long enough to not have a recipe written down anywhere. So when someone asks, I can't give them one. Just advice, from trial and error of making them myself.


When you buy sushi rice, or nori sheets(in my woolworths, both found in the pasta, rice, asian cooking aisle) there is a sushi roll recipe on the packet. 

I cook the rice according to the absorption method on the packet. Make sure you don't take the lid off to often, the simmer is at the lowest, and don't be afraid to add a little more water if needed. The rice really absorbs the water fast!

Two cups of uncooked rice will make about six rolls.

When the rice has cooled a bit, mix in the rice wine vinegar. I use a little less than the instructions say on the rice packet, the nori sheet packet says to use less, so find a balance that you like. Place in the fridge straight away and cool down. Don't use the rice to make your rolls if it is still hot.

My favourite protein fillings are seafood, whether that be smoked salmon(yum yum) or processed crab meat, or chicken.

The day I took these photos, I used left over meat from honey soy chicken wings, from the night before.

I made my own homemade mayo with grainy mustard. As an alternative to that, use whole egg mayo, or kewpie mayonnaise, with mustard or wasabi mixed in to flavour. 

Have all your ingredients and utensils ready and layed out around your rolling mat/teatowel before you start assembling. Have a plate ready to place your rolls on to go in the fridge before cutting into sections.
You really dont need a bamboo rolling mat, save your money and use a clean tea towel.

Place the nori sheet with the ridges facing up, and the shiny side facing down.


Spread the rice with wet fingers and a wet spoon as it can get a bit sticky, to a thickness of about 7mm, not quite one centimetre.


Make sure you leave about 3 cm at the top of the nori sheet with no rice.

Place a line of mayo, in a line across the rice, about half way.


Lay the meat over the mayo and add the other ingredients, like avocado, carrot or cucumber.

Start rolling the nori sheet, holding the filling in place as you roll. Not too tightly, as the nori sheet will split.


Just before you close that roll, brush some water at the end of the nori sheet. This will help the end of the roll seal.


When cutting the whole sushi rolls into 2-3 centimetre sections, use a chopping board and a sharp, wet knife to get a clean cut.

You will need to wipe down and re-wet the knife with cold water after a couple of cuts, as the rice will dirty the knife and the cuts will become less effective.

I hope this helps and gives you all a little more confidence to have a go at sushi rolls yourself :)


Monday, May 8, 2017

Kale pesto.


Yes boring old kale. 

I think there's a few people who are over it, who would rather eat an old boot.


When I planted kale, I did so with good intentions. Despite the plants growing magnificently and looking good, I have hardly used it. But in the last few weeks, that has changed and I have come to appreciate it a little more.

I don't have photographic evidence of the fantastic Colcannon mash potatoes I made using kale and cabbage from my veggie patch, but it was surprisingly good! 

I found a great recipe for soup on a packet of McKenzie's yellow split peas, which usually uses spinach. Don't have any of that, but what I did have in the old plot was silverbeet and you guessed it, Kale! It was delicious, and with this woeful autumn weather we're having, it went down a treat. For one. No one else in the house has the appreciation for soup like I do....so I eat it for days when I do make it. Plus I got to use the last of my basil pesto with it. 

Did I tell you it was 14 degrees yesterday? Soup weather right there. I treated myself to some fluffy slippers, last shopping day. Early mother's day present (she says with a nod of the head). It's keeping my toes warm in the mornings.

I wrote down a recipe for kale pesto in my scrap recipe book, because as I mentioned, I planted it with good intentions, the same reason I wrote the recipe down, I actually made it and it was good.


I made more soup, a couple days ago, which yes, I am still eating. There's one bowl left for lunch today, which I will be eating with kale pesto and a drizzle of chilli oil.

On Saturday night we had roast lamb, and the kale pesto was AMAZING on the meat. It is very similar to a salsa verde, or green sauce ('verde' being Spanish for green, and 'salsa' for sauce), which is awesome with roasted meats. You should try it.


I'll be making this pesto again for sure! The original recipe did not have pumpkin seeds included, it's up to you if you put them in. I am going to try it with walnuts next time, which are in season at the moment and on our last foraging trip around the place, found a tree to raid!

I keep it in the fridge, and usually add a layer of olive oil to the top. 

Kale pesto

1 cup torn kale, stems removed
1/2 cup grated parmesan
1 cup parsley
2 cloves of garlic
2 teaspoons lemon rind
2 tablespoons lemon juice
4 tablespoons olive oil
2 tablespoons pumpkin seeds

Process to your desired consistency and enjoy!


I've just planted this purple variety in the garden 


Monday, May 30, 2016

Scrumptious fish pie


I made this fish pie a few weeks ago. It was so unbelievably delicious. It was so moorish I had to lick the yumminess from the plate. So tasty.

The recipe was in a library book I borrowed, and I can't for the life of me remember what the book was called. So this recipe is from my memory banks as I couldn't find the book again!


700 grams fish (this could be a mixture of any seafood. I used Basa and Ling from the deli at Woolworths)
700 mls milk
1/4 cup flour
75 grams butter
1 teaspoon grainy mustard
1 cup frozen mixed veggies or peas
1 tablespoon chopped chives
1 tablespoon chopped parsley
2 sheets frozen puff pastry, thawed
1 egg, beaten well

Pour milk into a large saucepan and heat on a medium heat. Add the fish and poach for five minutes. Do not boil.

Strain the fish, retaining the milk. Break the fish into chunks and set the fish and milk aside.

Heat the butter on a medium heat, add flour and stir for a minute. Stir in the milk gradually. Add the mustard and cook, stirring until it thickens. About five minutes.

Add veggies, herbs and fish. Stir to combine and heat through. Season with salt and pepper.

Place in a pie dish.

Cover the fish mixture with puff pastry. Brush the pastry with beaten egg.

Cook in a 180 degree oven for 25 minutes, until the pastry is golden brown.


Monday, May 23, 2016

Thai chicken noodle soup - eat #fmy52weeksofmemories

 
Through Best Recipes' Best in Basket, I sampled two Campbell's Real soup bases. The Thai flavour and Spanish flavour.
 
Campbell's Thai soup is chicken stock infused with fish sauce, lemongrass, kaffir lime leaves, galangal, garlic, coriander and chilli. All you need to make tasty Thai soups.

There is a couple of recipes provided on the packaging, including one for Thai chicken noodle soup, which I made and really enjoyed!

Campbell's Spanish soup base is a vegetable based stock with added flavours of smoked paprika (I love this spice), capsicum, garlic, onion and tomato.

I made a Spanish and chorizo rice dish with this one, and a minestrone type soup. The Spanish soup base packaging provided a couple of recipes to make as well.


A Spanish bacon and vegetable soup. This was made with McKenzies soup mix and the
Campbell's Spanish real soup base

I much preferred the Thai soup base though and will buy it again to make Thai soups. It is really easy to impress your friends and family, and spoil yourself, not to mention it just tastes good.


Thai chicken noodle soup

50 grams vermicelli noodles
1 tablespoon oil
500 gr chicken breast, sliced thinly
1 litre Campbell's Real soup base
1 carrot, cut into matchsticks
65 grams snow peas, sliced thinly into strips
1/2 red capsicum, slice thinly into strips
a wedge of lime
fresh coriander leaves

Soak noodles in warm water.

Heat oil , add the sliced chicken and cook for 3 minutes.

Add the soup base and bring to the boil, lower heat and simmer for 15 minutes.

Add the drained noodles, carrot, snow peas and capsicum. Cook for a further five minutes.

Serve with a wedge of lime and fresh coriander leaves. If you'd like a little extra heat, garnish with thinly sliced chilli.


Monday, April 18, 2016

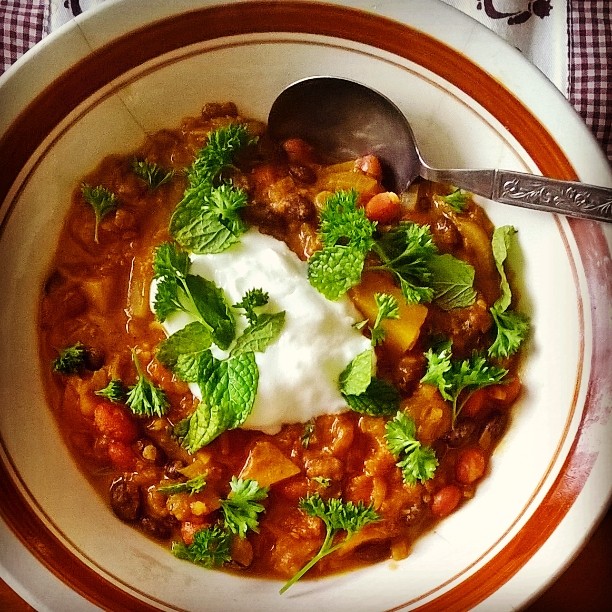
North African veggie casserole


I posted my lunch on Instagram the other day (as I do). Kimmie asked for the recipe, so here it is.

I have blogged the Baharat spice mix before, you can find it by following the link. If you can't be stuffed with that, buy something like Moroccan or Middle Eastern spice blend from the supermarket.

1 can lentils
1 can kidney beans
1 can black beans (Edgell)
1 can diced tomatoes
1 onion, diced
1 clove garlic, finely chopped
2 cups cubed squash
2 celery stalks
1 olive oil
3 Tablespoons Baharat spice mix
1/2 preserved lemon
2 cups water
plain yogurt, mint or coriander to garnish

Heat oil on a medium-high heat, add onion and fry until soft. Add baharat spice mix, garlic and stir for a minute.

Add 3 tablespoons of the water (so the spices don't burn), squash and celery and stir until water is absorbed.
Pour in tomatoes and rest of water. Bring to the boil and reduce heat to medium low.

Add the drained and rinsed lentils and beans. Simmer all ingredients uncovered for 15 minutes or until squash is cooked. I usually leave it until the liquid is thick and saucy.

Finely chop preserved lemon rind and stir into the casserole.

Serve up garnished with a dollop of yogurt and torn up mint leaves or coriander.
  • instead of squash, use pumpkin, sweet potato or eggplant
  • swap out the lentils or beans for chick peas
  • add some chilli for heat
  • if you don't have preserved lemon, garnish at the end with lemon zest
  • add some finely grated ginger with the spices for a flavour twist
-----Recipe adapted from the Maza recipe booklet-----

Monday, February 22, 2016

Roasted pumpkin and capsicum couscous salad


Cous cous is something I forget I have in the pantry. It gets pushed to the back, but I am always glad to see it when I go looking hard enough. It's like finding a long lost friend. I fondly speak to it, "Oh cous cous. Hello. Where have you been?". Yes I am a weirdo.

Here's what I did with my long lost friend. This salad is great warm or cold.


1 cup couscous
1/4 of a butternut pumpkin, diced
1 capsicum, chopped into large dice ( I used a bit of yellow, red and green)
1 tablespoon olive oil
1/4 cup sliced black olives
1/4 preserved lemon, finely sliced
A few finely sliced mint leaves

Place pumpkin and capsicum on a baking tray. Drizzle olive oil over and sprinkle with salt. Bake in a 180 degree oven for 15-20 minutes.

Put a cup of cous cous in a large heatproof jug. Pour 1 cup of boiling water over the cous cous and leave for five minutes.

Stir the cous cous to break it up. Add in the pumpkin, capsicum, olives, preserved lemon, mint and stir to combine.


Monday, February 15, 2016

Elaine's Oat Slice


This recipe comes from an extremely ratty cook book I own, The Beachport pony club family favourites. 

It's from the eighties I guess, and I picked it up in reasonable condition from a garage sale eons ago. It's been well used in that time and hasn't fared well. I still make recipes from it, like this oat slice. 

To be honest, its the first time I've made this particular slice. I usually make a chocolate slice from this book, everyone loves it. With the second week of school about to begin, I got my bake on because the cupboard was bare. It had all the ingredients for this one, so I went with it.

The recipe was supplied by Elaine Marshall. It's a good'un.

Oat Slice

120 grams butter
2 cups rolled oats
1 dessertspoon golden syrup
1 small cup coconut
1 small cup sugar

Melt butter, golden syrup and sugar in a saucepan. Combine dry ingredients in a bowl and pour in the melted butter mix.

Stir well until combined.

Spoon mixture into a greased and lined slice tray, and smooth out.

Bake at 170 degrees for 25-30 minutes.

Slice into squares when still warm.

I let it cool in the tin, then melted 100 grams of chocolate in the microwave. I then drizzled the melted chocolate over the top of the cut slice. 


Monday, January 4, 2016

See ya later 2015.


It's obvious looking at my #2015bestnine, that my flowers posts are most popular. I am in disbelief that there is not a food post there at all. My hubby does not understand why I photograph my food, let alone share it. I love my #onemotherkitchen posts.

I posted a photo of flowers on Instagram yesterday, that too is getting lots of likes. It seems this may well be a focus for me in 2016. I have been missing flowers in my house of late as I've been to bat shit crazy busy to get out and pick a bunch. The scorching hot days we've had haven't helped much either. Most of the flowers have been fried by the hot sun.

A photo of me made it as one of my highest liked. This was significant for me, in that it was taken after one of my evening walks, 15 weeks ago. Being more active and eating well has seen me lose 15 kilos in the latter half of last year. It was a turning point in doing something for me, I feel so much better for it. Although the last few weeks have me feeling a bit thick around the middle and a little emotionally worn out,  that 'time out for me' walk after dinner will have to make a return.

I love that my only crafting project of the year, a cross stitched table cloth made an appearance. A friend of mum's gave it to me, god knows how long she had it for. It was a pattern from an ancient New idea magazine. I still haven't used it, it's folded up in the linen cupboard and will probably stay there for a while longer. I'd need to get myself a plastic table cover to protect it from my messy kids. And then there's the mandala I coloured in. The only thing I coloured last year, and probably the last I will ever. I have not embraced the colouring craze.

What did you learn from your #2015bestnine?

Monday, October 26, 2015

Broccoli and stilton soup

You can beat finding absolute bargains at the supermarket. While doing my last big shop, I bought two packets of Stilton cheese. At their usual price they were $10.98 each, I could not leave them there for $1.10 each. They were swiftly put in the freezer upon arriving home.

Being an imperfect housewife, I still had a head of broccoli in the bottom of the fridge that was threatening to turn a lovely shade of yellow. The only thing I could think of to use it all at once, was soup.

The weather goes up and down like a yo-yo here in the south at the moment. This particular day, like today, was around 16 degrees. Yesterday it was 28! So soup is still acceptably on the menu, for me anyway. 

Izzy even had a go at the broccoli soup (without the cheese). Shock of all shocks, she enjoyed it. Win, win.

It wasn't until I was about delve into it's warmth, that I remembered the cheese in the freezer. I chopped a bit off and garnished the soup with it. It was heaven.

Stilton cheese isn't for everyone. It one of the 'blue' cheeses, or stinky cheeses and not loved by all!

I must blog my caramelised onion, stilton and rocket flatbread soon. It is delicious, so will be given a spin in the kitchen again in the near future.


Broccoli soup with Stilton cheese

1 head of broccoli, chopped, stalk and all
1 tablespoon olive oil
1 garlic clove, chopped
half and onion, or a small onion, chopped
2 bacon rashers, chopped
1 large, or two medium potatoes, chopped
about 5 cups of water

Gently fry onion, garlic and bacon in olive oil, until onion is soft.

Add broccoli and potato, then add water to just barely cover the veggies. You may not need all five cups of water. It is better to add too little, than too much, as you might end up with a watery soup. I like my soup thick. If it is too thick for your liking, you can always add a bit more water or even milk to make it a bit more creamier. The potatoes however give it a creaminess.

Bring to the boil, then simmer with the lid on for about 20 minutes, or until the potatoes are soft.

Blitz with a stick blender, or however you blitz your soup.

Serve in a bowl with a tablespoon of crumbled Stilton cheese scattered on top.

Yummo. I love the way the cheese melts through the hot soup :)


Monday, August 31, 2015

Homemade bread in a flash


This bread recipe is quick and easy. I found the recipe for 'Easy Peesy French Bread' at My Mundane and Miraculous Life blog, and have adapted it to suit me. If you asked me, I'd say it was as easy as piss french bread.

I find it not like traditional French bread, but for something that is ready in under an hour, it is worth whipping up on short notice.

I usually bake it when we are having spag bol and make garlic bread with it.

You can cook it during the day, so dinner time isn't so rushed. Lord knows how hard that time of night is and usually has me wishing I'd bought wine.


This is the yeast I buy, and I do like it says. I keep it in the fridge.


1 1/2 cups warm water (not hot, you will kill the yeast, been there, done that)
1 tablespoon honey (use a tablespoon of sugar if you don't have honey)
1 1/2 teaspoons salt
1 1/2 tablespoons Dry yeast
3 1/2 - 4 cups flour

Place everything except the flour in a bowl and stir to combine. Let sit for 10 minutes to go frothy.

Preheat oven to 220 degrees.

Mix in 3 1/2 cups of flour to form a dough. 

Knead in flour until it is not sticky. The dough should feel sticky, but not sticky enough that it still sticks all over your fingers.

Shape into two logs.

Cut slits in top and bake for 15 - 20 minutes. The loaf should sound hollow when knocked.

You could use the dough to bake a whole loaf, or divide it further into rolls. 

If you want to make garlic bread with it. I use 3/4 cup margarine, with 4-5 finely chopped garlic cloves mixed in. Slice the bread, not all the way through. Then spread the butter on both sides of the sections. Wrap in foil and bake at 220 degrees for 15 minutes. 

Garlic bread, with no green bits. My kids wouldn't touch it otherwise!


Related Posts Plugin for WordPress, Blogger...